22/10/2013

My experience with Topshop


I try and stay clear from high street fashion brands that have dipped their hands into beauty as a quick and easy way to make profit. The reasons for my disapproval is because they are created by fashion brands who don’t specialise in makeup, unlike brands such as Mac or Nars which were created for makeup professionals. Makeup is a second thought for these large fashion cooperation’s, therefore it is not their top priority. Their aim is to deliver to the masses and in my opinion they tend to fall short on their formulas, longevity, pigment and overall wear ability, plus I’m somewhat of a makeup snob! 

The exception to this rule is Topshop,  I’m sure Topshop’s primary motive for creating makeup wasn't their extreme passion for makeup, most likely they saw an avenue for making money, however I have warmed to their reasonable prices and all round good products  over time. My first purchase from Topshop was about a year ago now in the form of a fantastic highly pigmented highlighter in crescent moon, (sunbeam is better suited to darker skin tones), a beautiful shade that lasted and looked amazing dabbed into the inner corners of the eye. It would probably appear a bit full on for winter and better suited to accompany you on a night out, however at £10 it was totally value for money.
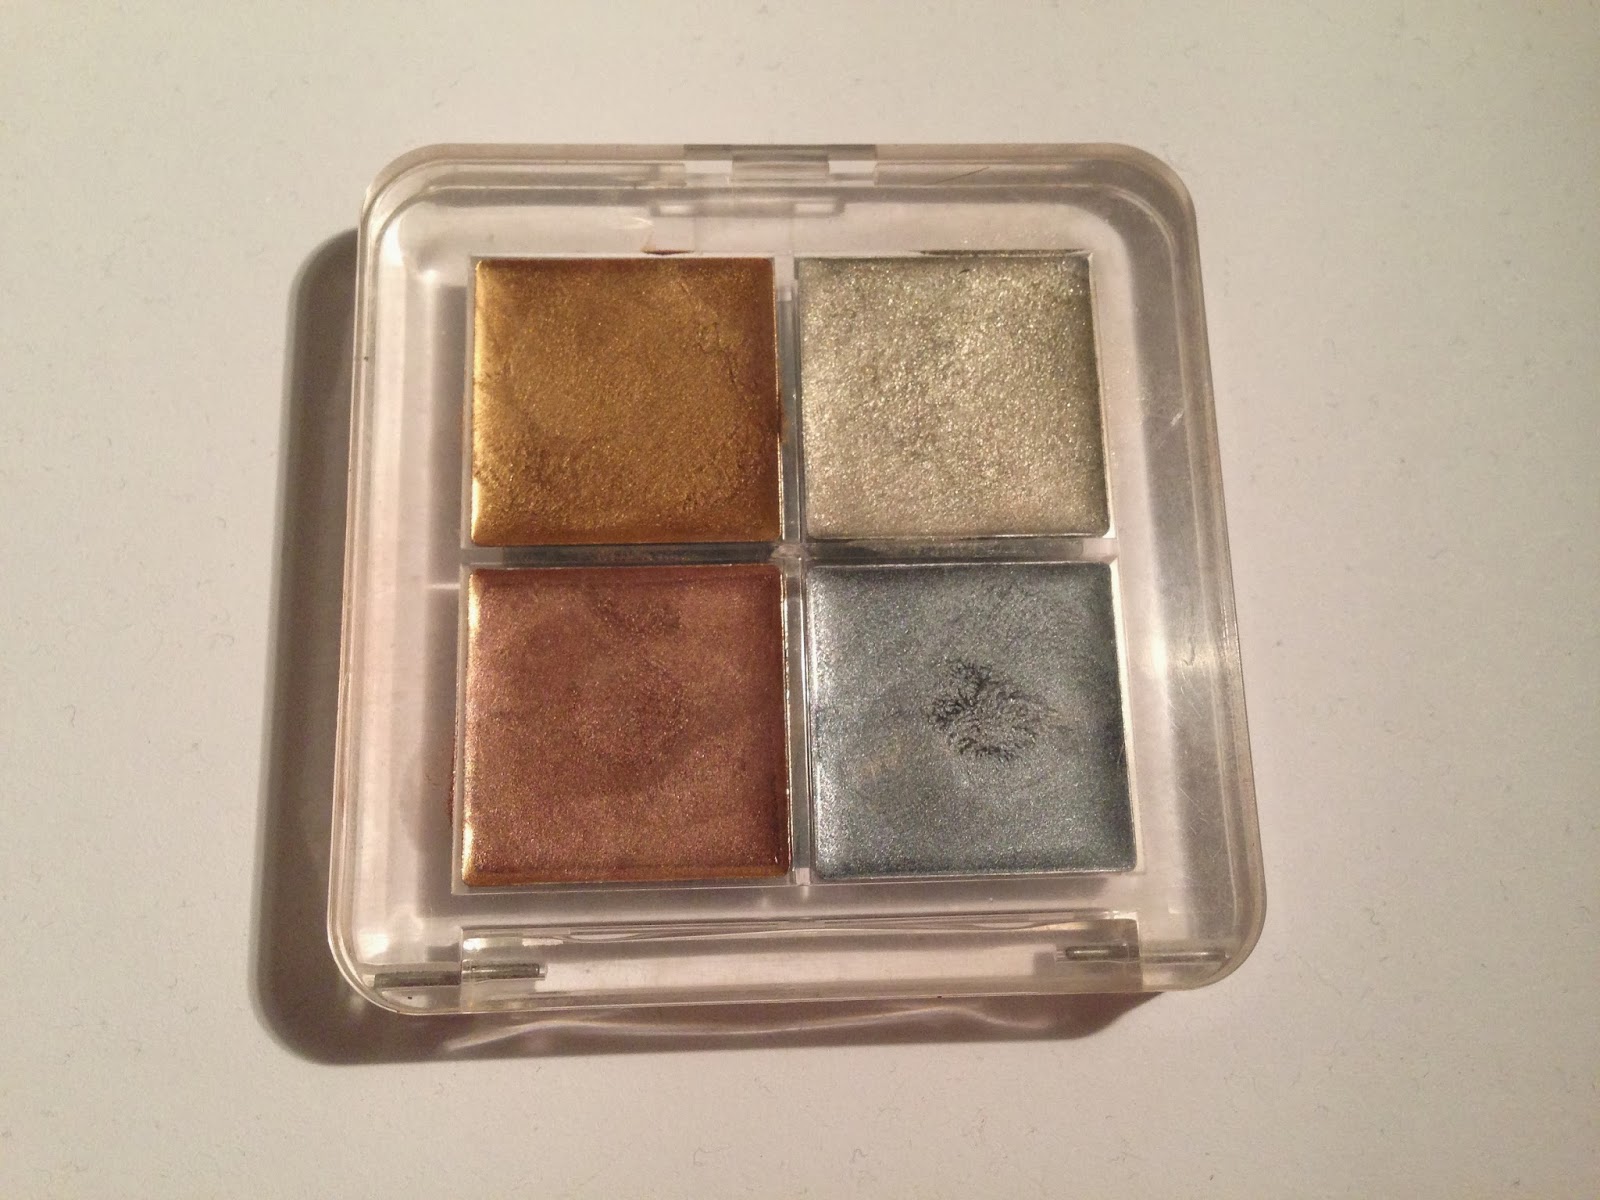
Since then Topshop makeup has blossomed and become even more popular with the masses and fellow beauty bloggers. So I decided to try some more products to make sure my purchase a year ago wasn't just a fluke.  Trawling through the endless pushing and shoving crowds at Topshop in Oxford Street really tested my patience, however I always recommend going into a store to buy makeup instead of online purchasing (unless you are buying a replacement/refill) because you can’t get a sense of the texture or colour of a product via a picture on the internet, in my opinion it’s best to see it in the flesh. After spending god knows how long in the store I finally decided  on Nevada (£8), a pale nude lipstick and a metallic eye shadow quad (£12.50) in Game On,  spending just over £20, (pretty reasonable for 5 products.)


I will whole heartedly say that the metallic eye quad in Game On is one of the best makeup products I have ever bought for £12.50!!  To this day I am completely mesmerised by the gorgeous intense metallic shades, which are ideal for the festive period. In fact the metallic blue shade was used on the catwalk at Topshop  AW13 show to help create a modern look, by teaming a juxtaposition of colours and textures together, overall this looked incredible and screamed attitude! 


I've always admired Kate Moss for her brilliant nude lip, effortlessly cool in my opinion. Searching for the perfect nude however is somewhat uncool especially in a sweaty packed store at rush hour, however I was intrigued by the lipstick in shade Nevada and it instantly reminded me of Mossy so for that reason alone it has to go in the basket. After reaching home somewhat drenched in sweat and looking like a five year old had decided to paint a bizarre rainbow all over my hands I sat down in my boudoir (small, cramped bedroom) to play around with my new buys!

I was warmly surprised by how well these products complemented each other. By keeping the lips nude it helped draw attention to the powerful gold eye that I had created with the palette. Unfortunately my excitement did not last long, in fact it lasted roughly an hour. I was not impressed by the lipstick in Nevada, instead angry and humiliated by the state of my lips. The lipstick had congealed and had turned into a line of thick sludge in the middle of my lips, (not hot,) rather disgusting. I must have appeared to the outside world as if I had some sort of  mouth disease and overall was very embarrassed that I had been walking around university head held high under the impression that my lips looked  extremely kissable in my new lipstick!!  Although I had a bad experience with the lipstick my eyes on the other hand still looked fabulous In fact the eye shadow stayed on for over 10 hours!! So, massive thumbs up for the eye shadow quad.


As for the lipstick I decided a couple of days later to give it another try!! This time I made sure I had spent an hour prior to application with a hydrating lip balm on and had exfoliated my lips thoroughly, I also applied a hydrating lip gloss under the lipstick to stop it from drying out. This process did work however I still felt the need to reapply lipstick every hour and I had to keep checking that the dreaded sludge lip hadn't returned to haunt me. Overall the lipstick is a fantastic shade and complements any skin tone; however the experience has left me somewhat unimpressed by this product and a tad scared to use it again!! With the winter weather approaching I feel a hydrating lipstick is more appropriate, so am still in the lookout for a perfect nude! The eye shadow palette however is an incredible purchase and I have used it on many different occasions to create a dramatic eye, I much prefer gel and cream based eye shadow to powder as they create a fresher more youthful look. I truly praise this product as a cheaper option for a gel/cream metallic eye quad.


Lipstick-Nevada buy online here!
Eyeshadow Quad-Game On buy online here!


Let me know if you love/hate Topshop makeup?
Anyone had the same problem with the lipstick?
If you have any questions please comment below and I will get back to you ASAP!!

Makeover at Nars with Benoit....


Like most women I am under the impression that there is something I am missing when it comes to makeup. I flick through the glossy magazines and see flawless glowing skin with huge perfectly lined eyes staring back at me and I feel like I'm being deceived, as if the beauty industry is keeping their treasured secrets under lock and key. Whilst the truth is yes, some makeup artists have their own tricks and tips when it comes to makeup application, they are certainly not hiding them from us instead most are extremely willing to share them.Wondering how you can be in the presence of a makeup genius? Well the answer is having a redeemable makeover at a department store.  I know I go on and on about redeemable makeovers, but I swear they are the best way to learn about makeup. STOP buying makeup from department stores without having one, if you need a new foundation or fancy a new lipstick find a time when you have an hour free and take advantage of having your face painted by true artists.

 My latest redeemable makeover, was memorable for all the right reasons! I have to say I don't think i have ever learnt so much information  in one hour (which is depressing bearing in mind how much money I spend on my university degree!), I truly felt like I was in makeup heaven. Somehow I managed to walk into Selfridges, without an appointment, on a friday at 5pm, (Rush hour in makeup land) and found myself in the world class hands of Benoit Dumont. Benoit has worked all over the world from prepping models for the catwalk to applying makeup for Film and TV and now works as a Nars national makeup artist.  I am certainly no model or movie star however Benoit treated me like one, he understood my request  to look like a goddess, to obtain a glowing complexion and give the illusion of bigger eyes and  lips, (the wish list of every girl).


Benoit got to work quickly  and I was extremely impressed with the Nars skincare range which was applied  prior to the makeup. The skincare products included  no unknown ingredients and Benoit assured me it was ideal for all skin types, ranging from dry sensitive skin, to  my oily spot prone skin. The Optimal Brightening Concentrate (a radiance boosting serum) helped the foundation look  flawless and stopped it from sticking to  dry patches (a sign of winter approaching.)

I applaud Benoit he was incredibly patient with my spot infested skin and treated me like royalty!!  What was so exciting about this makeover was the way Benoit explained every single thing he did, why he was doing it and accompanied by an invaluable tip. 


Benoit's top 5 tips (MUST READ)

1. Apply foundation onto the palm of the hand, warm it by rubbing onto the Palm and then apply using fingertips. I hear you screaming at the thought of not using your new Shu Umera foundation brush, but this  technique is something you really should try. It is way more hygienic for acne prone skin and allows you to be more precise with where you want to apply coverage plus you will use far less product (saving you money).

2. Matt vs glow was something in which Benoit was extremely passionate. He believed that you shouldn't make everything matt nor  should you attempt to  make everything glow (you will end up looking like you've been dipped in grease, ew.) The tip is to leave the cheeks  and eyelids glowing by using a liquid blush, cream eye shadow and illuminater whilst powdering along the t-zone. This will make you look super healthy and create a natural canvas.


3. Apply powder with a puff rather than a powder brush!! Powder brushes disturb the carefully applied concealer and foundation. Instead use a powder puff and press the powder into the skin, this will stop your powder from sitting on the skin and will completely set your makeup in place for the whole day.

4.  To create a healthy glow, apply a highlighter before your foundation, this way it looks more natural and doesn't just sit on the surface of the foundation.

5. Apply lip gloss under lipstick, I know it sounds crazy but it makes you look less like a wannabe barbie and more like a Victoria secrets model!!


 I have included the face chart Benoit created for my makeover which lists the products he used to create my look. During the makeover I fell in love with The Multiple in shade Copacabana and simply had to have it! This retractable stick, can be used for multiple uses from highlighter to lipstick and can help create dimension to your face on a dull day. The formula was creamy, bendable and easy to apply, when worn under the foundation it melted into the skin and created a gorgeous glow. If you are not already sold on this product you will be when i tell you that it contains Vitamin E and Accai oil for antioxidant benefits. This product is now firmly in my makeup routine and truly has made a massive difference in my overall appearance, (thank god.) Since I've started wearing this highlighter I have had an array of complements about how well rested and energised I look, (they must have missed the huge dark bags under my eyes.)


 Overall I really recommend a Nars redeemable makeover, after all it's free with a £30 pound or over spend on Nars makeup. It left me looking and feeling like a million dollars, whilst having learnt invaluable tips and tricks that I will treasure for life. 

You can buy Copacabana highlighter online, however I do recommend going into a department store and having the free makeover, it's an hour long and you won't regret it!  If you are impatient like me and can't wait to purchase this product buy it here !


Do you enjoy redeemable makeovers?
What brand would you go to for a redeemable makeover?
Do you love Nars multiple?
Any tips or tricks you couldn't live without?


09/10/2013

Heartbreaker


I've always believed that quickly splashing a couple of coats of nail varnish over my childish looking nails will be fine, not great, but fine. I have spent ridiculous sums of money trying to make them look more appealing however my style changes every day and I want my nails to reflect this.
Where I do like to spend my dollar is on False nails or crazy nail art and my love for these have blossomed, ending up today in a full blown addiction! I tend to  buy false nails specifically for an event and will only keep them on for roughly a day!


You can find quite a large array of falsies in boots in the nail aisle, which is where I found these Henry Hollands nails (eeekk) instantly fell in love!! I am a huge fan of Henry's outlandish style and with the recent craze for crazy nail art there is no one better to design a range of fun nails!! This particular set of falsies have red hearts cleverly painted on the ends, some have  broken hearts, (for days when you are feeling particularly unforgiving.)  Personally they suit my crazy personality, however if they don't grab your attention check out his other sets online here.


I can honestly tell you now that I am the most inpatient person that exists, I can't wait for anything in life and especially not my nails to dry!  I've become reliant on false nails such as these, they are easy to apply, finished to a high standard, (don't look like a 5 year old has painted your nails) and don't require you to waste your time waiting for them to set!

Let me know your opinion on falsies?
Do you love or hate House of Holland nails?

04/10/2013

Intense Blue Eyes


 Are you in a makeup rut? Or just bored of your everyday brown/ black eye shadow shades, how about trying Blue eye shadow seen at LFW on the Topshop models! I know what you are thinking has she lost the plot, but seriously this look is fun and actually looks really alluring!! Although my brother did say I looked like I had been punched in the face, I will ignore his comments and continue to think I look pretty cool rocking my blue eyes!! You can either create a subtle blue eye by simply dotting the blue into the corner of the eyes or go wild and wash the shade all over your lids! This looks amazing on blue eyes as it really highlights your eye colour, check out pictures of Cara Delevigne at the Topshop show to highlight my point!

For a colourful eye shadow I headed straight to the Illamasqua counter at Selfridges and picked up this little beauty, a powder eye shadow called intense, definitely suits its name. This colour is a rich matte teal blue without any sparkle and glitter, which is great for me as I'm not really a fan of glitter in eyeshdow unless it a metallic shade and even then I don't want to see any glitter, instead I'm looking for strong pigment and shimmer.
If you have green or blue eyes, you should try blue eye shadow, don't however make the mistake of buying a high street one which doesn't have a strong pigment. The idea for this look isn't to make it look natural, it needs to be strong and heavy in my opinion and this will really make your eye colour pop!

Do you rock the blue eye shadow?
Whats your favourite colour to wear on your eyes?
Let me know if you have any questions about this look or the product in the comments below!

03/10/2013

What's in my makeup bag this week....


-Giorgio Armani, Maestro Fusion Foundation
I've been testing this foundation for the last couple of weeks; In fact see the blog post below to find a full review of this product.  This foundation is perfect for Oily skin and those who prefer a lighter buildable coverage making it ideal for a daytime look.

-Illamasqua- Neutral Palette
Again you can find a full review of this product if you scroll down through my blog posts. Ideal for taking around in my make-up bag as it has everything you need, a deep brown, matte black, shimmery gold and an off white base in one small case (it rhymes!) which pops easily into any make-up case! Great if you plan on taking your day look into an evening look but don’t have time to go home and alter, pop this into your make-up bag, It has all the colours for updating your look.

-Kevyn Aucoin- Eyebrow pencil
I am somewhat of a brow girl, meaning I am constantly trying to achieve a stronger brow than the one that I’ve been blessed with this eyebrow pencil is ideal for an everyday use and is super easy to use, creating eyebrows that look natural (like my eyebrow idol Delevigne.)

-Kevyn Aucoin- Eyeliner in Basic Black
Since Charlotte Tilbury has realised her make-up collection I've become slightly obsessed with her dramatic black kohl lined eyes. This Eyeliner in Basic Black is incredible, so creamy and easy to blend/smudge but then sets and lasts all day long! Creates a very intense look, but could be just used to line the top eyelash line.

-Kevyn Acuoin- Eyelash Curler
Eyelash Curlers are an essential of mine!! I use them every morning just to help open my eyes and to give the effect of larger wider eyes.

-Prada- Makeup bag
This make-up bag was in fact a freebie!! Can you believe it!! I obtained it when I bought Prada’s fragrance Candy probably about a year ago now and have used it ever since! However if you can recommend a small fun make-up bag let me know in a comment below.

-Mac, Lipstick in Please me
I have been using this lipstick as my everyday lipstick for the last week and adore the creamy texture it creates along with being a great shade for my colourings.

-Mac, Dazzleglass
Too create the effect of bigger lips I use Dazzleglass by mac and simply dot it in the centre of my lips this gives the illusion of larger juicy lips. I recommend this lip gloss as it is a beautiful natural looking pink perfect for the day.

-Paris Ax- Fan Brush
Recently did a review on this makeup brush, I find it great for applying powder and blush which I often need to top up during the day.

-Bobbi Brown- Blush in Apricot
This blusher creates a really healthy looking glow, I've had really bad PMS face lately, (sunken, grey, swollen, spotty looking face) and after reading Lisa Eldridges blog post on ‘PMS FACE’  I realised that an apricot blush like my Bobbi brown one can really help make me look alive again.


02/10/2013

Review- Giorgio Armani, Maestro Fusion Foundation


Before you start criticizing me I apologise in advance for the fact that I've only just discovered this foundation! yes I have been incredibly slow, and yes you probably have read a review on this product thousands of times, but if you are the select few and have somehow managed to bypass Giorgio Armani's Maestro Fusion Foundation then I am writing this review for you!!


I was Persuaded to buy this foundation by Elle's September issue in which they named it best foundation (must be good) at reading this I thought I best see what all the hype is about. This foundation is very  bizarre, this isn't a bad thing per say just an observation. Describing the texture and feel when applied on the skin is difficult all I can really say is that it begins as a consistency of a really thin oil and then once on skin its seemed to disappear leaving your skin looking as if you are hardly wearing any makeup in fact it is almost detectable to the naked eye. It doesn't offer a huge amount of coverage but is certainly more than a tinted mosturiser. If you have relatively good skin and want a hardly-there look but relay on a foundation to wake up your skin and make you look healthy then this is the foundation for you, especially if you have normal-oily skin (dryer skin be cautious of this foundation.) My boyfriend is very quick to pick out girls that are caked in too much foundation, so I now fear the dreaded cake look making this product  perfect for me, in fact he actually applauded me for not wearing any foundation and looking great even though I was wearing The Maestro Fusion Foundation (what he doesn't know wont kill him.)  It's a build-able foundation which means you can follow my approach and apply one thin coat to the entire face but then another layer to the t-zone to give more coverage when you need it!

The application isn't exactly mess free, but it does help control how much you need, without the too much with two pumps, two little with one pump dilemma. One thing I would say is that be careful wearing this foundation if you have dry skin and I recommend a hydrating moisturizer and serum prior to application. It's not that it drys the skin out,  It just seems to stick to any dry patches creating a flaky appearance, (not hot.)  This Foundation manages my oily t-zone extremely well and doesn't cause me to break out (yay) and stays put all day long (with the help of powder.) 

Although I admire this foundation for creating a undetectable look whilst still giving the right amount of coverage, I will not be re-purchasing it anytime soon. Firstly because this pot Is going to last my ages and secondly because as the nights are getting darker I can feel the dreaded cold winter days approaching, meaning only one thing for me, dry skin!! :( Sadly this foundation does not seem to be able to handle any dryness on the face so I will be looking for a more hydrating foundation, perhaps I will pick this back up in the summer months.

I'm shade 6, I wouldn't recommend buying online as it is hard to guess your shade, go into a department store such as Selfridges and be colour matched. 

Let me know if you Love or hate this product?
Are you being loyal and sticking to it over winter?
Or just if you have any questions, please comment below :)

01/10/2013

That why the lady she's a Vamp!


When wearing makeup I try and stick to either intense eyes or an intense lip, not because I oppose to wearing both together, I just believe if you concentrate on one area such as the lip its a stronger look, plus it wears well in the day.
Saying that this look that I created has both a deep eye and lip and I have to say it creates a wow effect!!  My aim for this look was to make the perfect lip shade, (yes I concocted it myself) I wanted a really deep wine shade and whilst I have loads of striking pillar box red lipsticks, I have yet to find my perfect DEEP RED. Soo... I decided to mix and mix I did, Using Giorgio Armani lipstick in shade Rouge D'Armani as my base colour, I  then added  Bourgois  Queen Attitude eyeliner stick to darken the shade (I've named my shade Vamp). I know what you are thinking, eyeliner as lipstick, shes lost the plot!! Fear not, I'm not totally bonkers, I've used this trick for ages now, I think using beauty products in different ways is fun and follows my ethos, when it comes to makeup- Play around!! I wouldn't however recommend mixing your lipstick with eyeliner everyday as it probably wouldn't be very moisturizing and might make your lips dry out, but every know and then its perfectly fine to use. This trick will  also make your lipstick stay on all night long so you won't need to keep running to the toilet to touch up!

For the eyes I used my Urban Decay palette with the shades Dark horse as my base, toasted along the eye crease and hustle in the corner of the eye to darken the look. I then blended the entire pigment right to my eyebrow, before using Kevyn Aucoin eyeliner  in Basic Black all over the waterline, drawing it around the entire eye and smoking it out. I applied lashings of Kevyn Aucoin Mascara  and for the eyebrows I used benefit Brow Zing palette and filled in my brows and elongated them.

Let me know what you think of this look?
Have you ever mixed to create your perfect lipstick colour?
Or are you actually sane and can recommend any good deep wine lipsticks?
comment below :)